設備與材料
個人電腦 × 1
arduino Uno × 1
麵包板 × 1
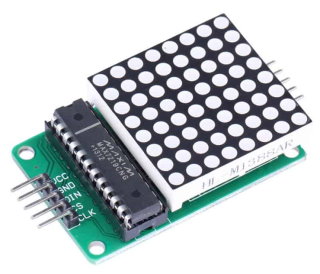
8×8 LED Matrix MAX7219 模組 × 1
連接線 若干
實體接線圖

匯入函式庫
本實習使用 LedControl 程式庫 作控制,你的 Arduino IDE 必需要匯入該程式庫,你可以在 本站下載 (1.0.5) ,或是到 GitHub下載 ,下載後記得匯入程式庫,如果不會匯入可以參考 匯入zip程式庫 這篇說明
LedControl 物件使用說明
* 宣告 LedControl 物件:
LedControl(int dataPin, int clkPin, int csPin, int numDevices);
int dataPin : Arduino 資料輸出的 Pin
int clockPin : 時脈 Clock Pin
int csPin : 當資料被送出時選擇的設備 device
int numDevices : 最多有多少個設備要被控制
* 設定進入省電模式:
shutdown(int addr, bool b);
int addr : 控制顯示的位址
boolean b : 設定為 true,設備進入電力中斷模式,設定為 false 為正常模式
*設定顯示亮度:
setIntensity(int addr, int intensity);
int addr : 控制顯示的位址
int intensity : 顯示器的亮度,介於 0(最暗) 及15(最亮) 之間
*所有LED設定成不顯示:
clearDisplay(int addr);
int addr : 控制顯示的位址
*設定單一個LED 的亮或滅狀態:
setLed(int addr, int row, int col, boolean state);
addr : 顯示的位址 row : Led的列數 (0..7)
col : Led的欄數 (0..7)
state : 設定為 true,Led為亮,設定為 false,則關閉 Led 顯示
* 設定指定列的8個LED 亮或滅狀態:
setRow(int addr, int row, byte value);
addr : 顯示的位址
row : 列的編號 (0..7)
value : 8 bits 來顯示該列的LED是否為亮,1為亮,0為暗
*設定指定行的8個LED 亮或滅狀態:
setColumn(int addr, int col, byte value);
addr : 顯示的位址
col : 行的編號 (0..7)
value : 8 bits 來顯示該欄的LED是否為亮,1為亮,0為暗
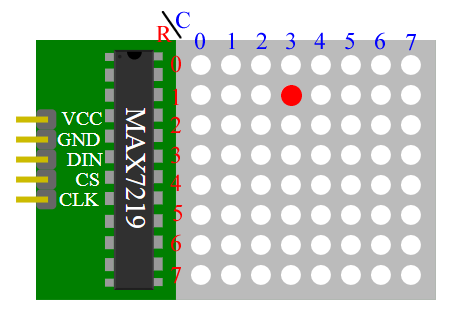
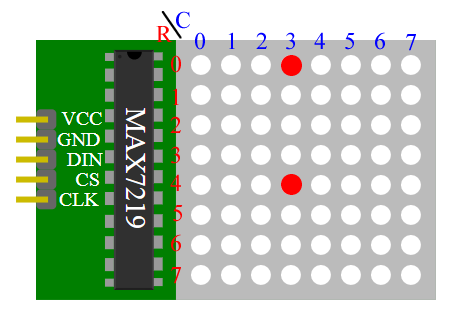
如果你要顯示下圖 R1C3(列1行3) 那點,你可以打下列指令
lc.setLed(0,1,3,1); // 將Led的列1行3設定為亮
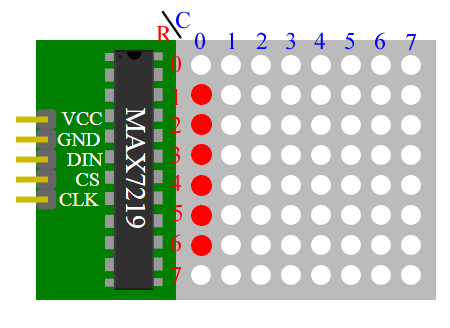
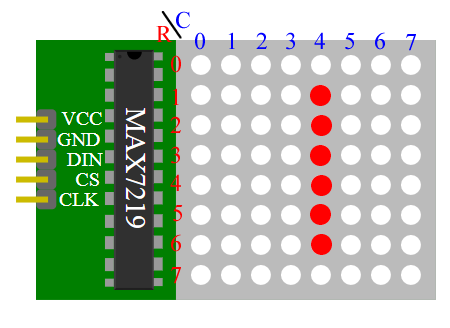
如果你要顯示下圖 C0(行0) 那8個點,你可以打下列指令
lc.setColumn(0,0,B01111110);//將二進制 01111110顯示在 第0個 8x8LED陣列的第0行
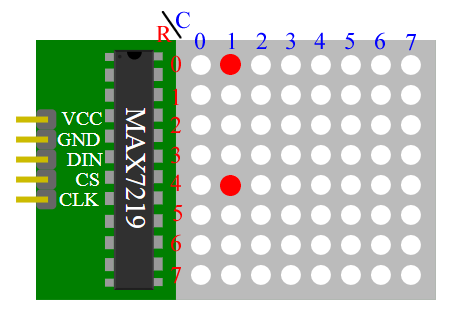
如果你要顯示下圖 C1(行1) 那8個點,你可以打下列指令
lc.setColumn(0,1,B10001000);//將二進制 10001000顯示在 第0個 8x8LED陣列的第1行
如果你要顯示下圖 C2(行2) 那8個點,你可以打下列指令
lc.setColumn(0,2,B10001000);//將二進制 10001000 顯示在 第0個 8x8LED陣列的第2行

如果你要顯示下圖 C3(行3) 那8個點,你可以打下列指令
lc.setColumn(0,3,B10001000);//將二進制 10001000 顯示在 第0個 8x8LED陣列的第3行
如果你要顯示下圖 C4(行4) 那8個點,你可以打下列指令
lc.setColumn(0,4,B01111110);//將二進制 01111110 顯示在 第0個 8x8LED陣列的第4行
如果你要顯示下圖 C0~C4(行0~行) 5行,你可以打下列指令
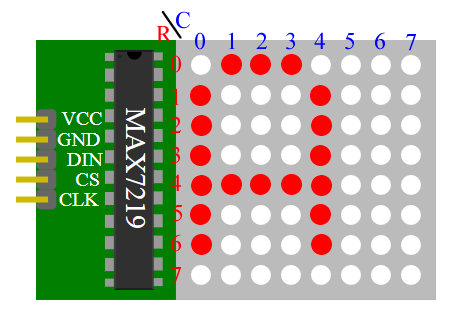
 byte a[5]={B01111110,B10001000,B10001000,B10001000,B01111110};
 for(int j=0;j<5;j++){
    lc.setColumn(0,j,a[j]);
  }
參考程式1
//依序亮每一顆LED 再依序滅每一顆LED
#include "LedControl.h"  //引用 LedControl 程式庫
LedControl lc=LedControl(12,11,10,1);  //宣告 LedControl 物件

void setup() {
  lc.shutdown(0,false);  // 關閉省電模式
  lc.setIntensity(0,0);  // 設定亮度為 0 (介於0~15之間)
  lc.clearDisplay(0);    // 清除螢幕
}

void loop() {
  int col;
  int row;
  for(col=0;col<8;col++){
    for(row=0;row<8;row++){
      lc.setLed(0,row,col,1); // 將Led的列,行設定為亮
      delay(100);
    }
  }
  for(col=7;col>=0;col--){
    for(row=7;row>=0;row--){
      lc.setLed(0,row,col,0); // 將Led的列,行設定為暗
      delay(100);

    }
  }

}
參考程式2
//依序顯示 a,r,d,u,i,n,o

#include "LedControl.h"  //引用 LedControl 程式庫
LedControl lc=LedControl(12,11,10,1);  //宣告 LedControl 物件

//字型碼
byte a[5]={B01111110,B10001000,B10001000,B10001000,B01111110};
byte r[5]={B00111110,B00010000,B00100000,B00100000,B00010000};
byte d[5]={B00011100,B00100010,B00100010,B00010010,B11111110};
byte u[5]={B00111100,B00000010,B00000010,B00000100,B00111110};
byte i[5]={B00000000,B00100010,B10111110,B00000010,B00000000};
byte n[5]={B00111110,B00010000,B00100000,B00100000,B00011110};
byte o[5]={B00011100,B00100010,B00100010,B00100010,B00011100};


void setup() {
  lc.shutdown(0,false);  // 關閉省電模式
  lc.setIntensity(0,0);  // 設定亮度為 0 (介於0~15之間)
  lc.clearDisplay(0);    // 清除螢幕
}

void loop() {
  //顯示 A
  for(int j=0;j<5;j++){
    //顯示 0~4 行
    lc.setColumn(0,j,a[j]);
  }
  delay(500);

  //顯示 r
  for(int j=0;j<5;j++){
    //顯示 0~4 行
    lc.setColumn(0,j,r[j]);
  }
  delay(500);

  //顯示 d
  for(int j=0;j<5;j++){
    //顯示 0~4 行
    lc.setColumn(0,j,d[j]);
  }
  delay(500);

  //顯示 u
  for(int j=0;j<5;j++){
    //顯示 0~4 行
    lc.setColumn(0,j,u[j]);
  }
  delay(500);

  //顯示 i
  for(int j=0;j<5;j++){
    //顯示 0~4 行
    lc.setColumn(0,j,i[j]);
  }
  delay(500);

  //顯示 n
  for(int j=0;j<5;j++){
    //顯示 0~4 行
    lc.setColumn(0,j,n[j]);
  }
  delay(500);

  //顯示 o
  for(int j=0;j<5;j++){
    //顯示 0~4 行
    lc.setColumn(0,j,o[j]);
  }
  delay(500);
}
功能
請參考 程式1 與 程式2,在 8*8 LED Matrix MAX7219 顯示 E 加上工作崗位號碼一直重複顯示。
假設你的工作崗位是 5 號
步驟1:顯示 “E” 0.5秒後
步驟2:顯示 “0” 0.5秒後
步驟3:顯示 “5” 0.5秒後
重複 步驟1
相關知識
匯入zip程式庫
8*8 LED Matrix MAX7219
進制表示
自定函數
if 判斷式
if else 判斷式
digitalRead 函式
boolean
陣列
for 迴圈
Arduino 複合運算子
const
Arduino Uno 硬體
int
void
setup 函數
loop 函數
pinMode 函數
digitalWrite 函數
delay 函數
Arduino 輸出實習(單燈閃爍)
Arduino 輸出實習(跑馬燈-愚公移山)
Arduino 輸出實習(跑馬燈-for迴圈)
Arduino 數位輸入實習
Arduino 數位輸入實習(INPUT_PULLUP)
Arduino 類比輸入實習
Arduino PWM 實習 (呼吸燈)
Arduino PWM 實習 (光感應調光燈)
Arduino 8×8 LED Matrix MAX7219 實習
Arduino 紅綠燈小綠人 實習
Arduino 計時器 實習
Arduino 音樂盒
Arduino 電子琴(鍵盤掃描)
Arduino DHT11 溫濕度感應器
Arduino OLED 顯示
Arduino 超音波測距模組 HC-SR04
Arduino 執行時間實習
Arduino 電容測試器
Arduino 紅外線接收實習
Arduino 紅外線發射實習 EPSON 投影機控制
ESP-12F 網路智慧開關(MQTT)
ESP-12F 雲端記錄型 K-Type 溫度計(MQTT ThingSpeak)
ESP-12F 手機雲端紅外線控制
ESP-12F 網路電台收音機
ESP-12F 電子鼓